Add Kapa AI search
This page provides some quick guidance on adding Kapa to your Material for MkDocs documentation site.
Kapa: what and why
Kapa provides a RAG chatbot. From their site:
Kapa.ai turns your technical content into a production-ready Al assistant you can deploy on your documentation in days.
You add a chatbot to your site that’s focused on your content. The answers use the sources that you’ve chosen to connect. This makes them more likely to be accurate and up to date compared to a generic AI.
Kapa can pull in a wide range of data sources in addition to your documentation site, and you can add the chatbot to places like your company Slack or Discord, not just your docs. It also provides some very useful analytics and feedback from users, which can help identify documentation gaps (this is one of my favourite features). You can review user questions, see which ones it struggled to answer, and where you can improve your docs. Kapa is constantly adding new features, so check out their website for full details.
At the moment (May 31, 2025), Kapa does the initial setup for all users, and doesn’t have a completely self-serve option. They generously gave me a free trial to play around with it. I’m hoping they’ll eventually offer self-serve, as it felt fairly straightforward to set up myself.
Adding Kapa as a simple widget
By default, Kapa provides a widget in the bottom right of your site. If you want to use this, then you can work through the Kapa docs.
- Connect Data Sources: connect your documentation site, and any other sources.
- Add AI to MkDocs: follow Kapa’s own guide to add the widget.
- Explore the Configuration options to customize the widget.
Open Kapa from the search box
Here’s one of my mildly spicy docs takes: I really don’t like widgets in the bottom right of the site. I think they’re visually distracting, potentially get in the way of the content, and have bad associations: how many times have you had a frustrating conversation with a ‘help’ bot delivered using that type of widget?
Opening Kapa from the search box is a quick way to hide the widget and lead users to it through the search bar instead. The main benefits of this approach are:
- No distracting widget.
- AI is in the same place as search. Given that asking AI and searching on a docs site fulfill similar purposes, users are likely to find this intuitive.
- Users search first: they use the site search, then go to AI if needed. The site search is faster, and doesn’t cost tokens.
The downside of this approach: it reduces Kapa usage. If you’re wanting to see as many user questions as possible in Kapa’s analytics, avoid this method.
To open Kapa from the search box:
- Set up the widget, then hide it.
- Add a button to the search bar to open the Kapa search. When a user searches, they can click the AI button. This opens the Kapa search modal and pass it the user’s search query.
Steps:
- Connect Data Sources: connect your documentation site, and any other sources.
- Add AI to MkDocs: follow Kapa’s own guide to add the widget.
- Having added the widget, hide it by setting
script.setAttribute("data-button-hide", true);ininit_kapa_widget.js. - Override Material for MkDocs’
search.htmlpartial:- Follow the Material docs to add an overrides directory if you don’t have one already.
- In the
overridesdirectory, createpartials/search.html. - Copy in the theme’s search partial. MkDocs now uses this search partial, rather than the one from the theme.
- Add a button to your search partial that opens the Kapa AI modal. This button should go inside the search options
<nav>element.html hl_lines="6-17" <!-- Search options --> <nav class="md-search__options" aria-label="{{ lang.t('search') }}" > <!-- Button to ask Kapa AI --> <button type="button" class="md-search__icon md-icon" title="Ask AI" aria-label="Ask AI" tabindex="-1" onclick="window.Kapa.open({ query: document.querySelector('[data-md-component=search-query]').value, submit: true })" > {% set icon = config.theme.icon.share or "material/robot" %} {% include ".icons/" ~ icon ~ ".svg" %} </button> ...The key part of this code iswindow.Kapa.open({ query: document.querySelector('[data-md-component=search-query]').value, submit: true }), which takes the user’s search query and passes it to the Kapa modal.
Add a separate Kapa button
This is the approach I took in n8n’s documentation.
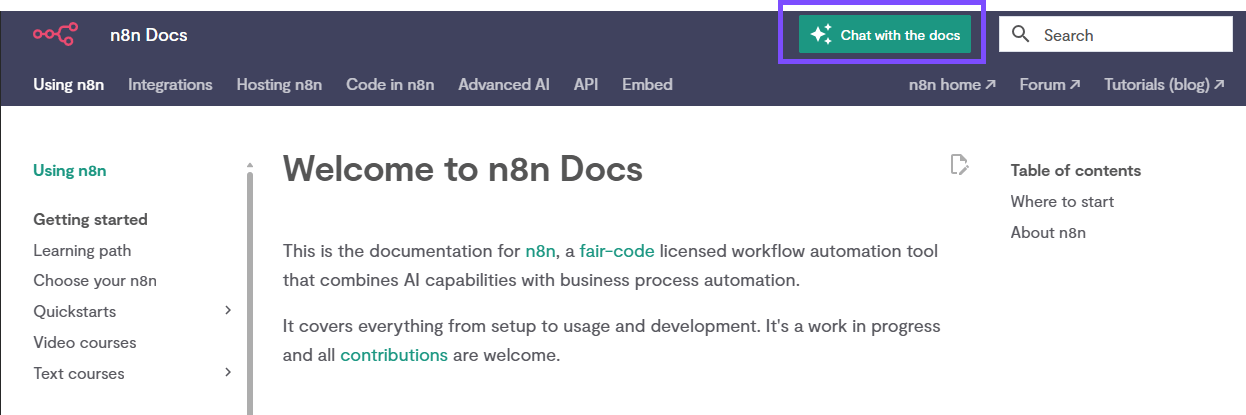
See it in action on n8n’s docs site.
For specific details of the n8n implementation, explore n8n’s docs repository. The kapaButton partial contains the button HTML and display logic.
Steps:
- Connect Data Sources: connect your documentation site, and any other sources.
- Add AI to MkDocs: follow Kapa’s own guide to add the widget.
- Having added the widget, hide it by setting
script.setAttribute("data-button-hide", true);ininit_kapa_widget.js. - Create a partial for your button. Although this isn’t overriding an existing partial, you can still put it in your
overridesdirectory. If you’re not familiar with overrides and theme extension in Material for MkDocs, refer to Customization | Extending the theme. - Include the partial wherever you want to display it. For example, to put it next to the search box:
- In the
overridesdirectory, createpartials/header.html. - Copy in the theme’s header partial. MkDocs now uses this header partial, rather than the one from the theme.
- Include your Kapa button partial beside the search element:
html title="header.html" hl_lines="2" <!-- other header elements --> {% include "partials/kapaButton.html" %} <!-- Button to open search modal --> {% if "material/search" in config.plugins %} ...
- In the